ART OF THE MASTERS Workshop

Hello, Artists,

gilbertsunnewsarticle6-2016

We are planning a workshop the week of November 14, 2016, which is our only opportunity window for quite a few months. Can you make it? We will also have a Free Prep Day on November 7, a week before the workshop, in order to help you get a wonderful start. The cost for the 5 days is $489.

Art of the Masters Workshop
When: Nov. 14-18, 2016
Where:  Gilbert, Arizona
Time: daily, 9:00 – 5:00

If you feel undecided, maybe now is the time to get off that fence and embrace your true art self. We promise that you will get more step-by-step art instruction in one week with us, than you will get anywhere else, even in workshops that cost more than twice what we charge. We also give you helpful handouts (most art classes don’t) because we want you to be able to remember and continue working on what we’ve taught you. To us, the most important thing is continuing the legacy of the Old Masters, and we are passionate about passing on their wisdom and techniques to others. We would love to have you with us!

And like Maestro Frank Covino always did, we offer $100 off the cost of your tuition for each of your friends that sign up for the class.

Below is a sample of first-time student drawing (24″ x 30″), in preparation for painting.  Amazing, huh!

P1110792

Here are things needed for the Free Prep Day:

Materials for board preparation, graphing, and drawing:
Ampersand Gessobord brand surface
metal yardstick and ruler
ultra-fine Sharpies, various colors (black, blue, and red are probably enough)
General’s charcoal pencils, soft
kneaded eraser
High quality photo of Old Master painting to work from, printed on 8 1/2”x11” glossy photo paper, one grayscale, one color–Art Renewal Center is an excellent online museum source– https://artrenewal.org/pages/search.php
blending stumps (tortillions)
Exacto knife
spray workable fixative
clear tape
acetate

Other helpful items:
transparent 18” triangle
India ink and sable liner brush
artist’s white tape, removable

Please respond below, and we’ll get right back to you!

Marsha and Karen
Art of the Masters

ART OF THE MASTERS Workshop Wonders!

Hello, Artists,

We thought you might want to see some of the work just completed at our first Art of the Masters workshop last week in Gilbert, Arizona.  Karen and I were so proud of our students’ success thus far.  Here are some pictures:

P1110751

Shelly H.  in early stages of drawing At the Fountain, after William-Adolphe Bouguereau, 1897

P1110754

Shelley B. drawing The Laundress, after Jean-Baptiste Greuze, 1761

P1110760

Teachers Marsha Gilliam (in the mirror) and Karen Schmeiser, with student Shelly H.

P1110794

Completed charcoal drawing~

P1110795

Completed drawing with partial verdaccio underpainting~

Below are the students’ drawings alongside actual paintings by Greuze and Bouguereau.  When completed, students’ works will look like these original works, and Shelley and Shelly will have learned much about seeing, drawing and painting during this process of copying the Masters:

P1110792GreuzeTheLaundress1761

P1110788BouguereauAtTheFountain1897

We hope you enjoyed seeing some student work, and hope you will be able to join us for our next event.  Where else can new artists get a five-day workshop with two teachers for $489?  We are in this to perpetuate the systems and processes of the Old Masters, and are planning another workshop in the fall, to be announced.

YOU CAN CAN CAN do this too,

Marsha and Karen 🙂

CARESSING A FOOT

I just completed this commission, The Apotheosis of Love, on the occasion of a wedding, and my patrons loved it.  It went on a plane to Boston:

PaintingMarshasTheApotheosisOfLoveGlazedCompletedRtchdP1110668

Here it is, framed, with brass title:

PaintingMarshasTheApotheosisOfLoveFramedGlazedCompletedRtchdP1110668

I especially addressed the front foot–I studied the subtle shadows that make it work–or not.  In the first foot picture below, the toes, nails, and veins still need completion, but the most important area that needed altering was on the top front.  It was just slightly too dark–not even half a value–but what a huge difference it made when I lightened it ever-so-slightly!  I am attaching a “before and after,” with the original model, just so you can see what I mean.  Here is the model:

PaintingRefApotheosisFeet

Here, the top front half looks flattened and scooped like a spoon because its value is too dark, even though I followed the model:

ApotheosisFeetStillNeedCompletedToesNailsVeinsCoveredWflesh

and here is the corrected version:

ApotheosisFeetCompleted

Yes, the overall tone of the pictures are different because one was taken at night, but it is the VALUE difference that counts.  The foot, with toes, nails, and veins, is completed in the second picture.  I changed nothing on the drawing itself.  Just the slight value change is all that mattered.

I will eventually come up with a step-by-step to share, but even then, it is mostly just a lot of work, time, and careful observation, stepping back six feet and comparing it to the model, squinting, looking at it through a mirror–you have to pull out all the tricks!  And even when you think you’ve nailed the drawing and the underpainting, the slightest color shift matters, even when the color values you are applying match the value of the underpainting perfectly.

Regarding the importance of slight color shifts, I have a theory that I can find no information about.  Perhaps it already has a name, but I am going to call it something like “How Color Shifts Value Perception.” I wonder if anyone else has observed this phenomenon?  Have you? It would probably be a boring topic for anyone but an artist.

I’m designing another painting that has a tight time limit for completion.  My Aunt Goldie will be 95 years old  in July, and I want to do a painting of her, quilting, since she has been an award-winning quilter all her life.  I have the references, we’re picking up the precut board tomorrow, and I’m doing a square format (24″ x 24″).  This is one of those rare occasions when traditional formats will not work, due to the length of the quilt frame in relation to her body.  I hope to have the drawing finished by the end of next week.   I’ll post it when I can.  There is only one hand showing in the reference, complete with thimble and needle, so it won’t be a good candidate this time for my step-by-step model.

Giclée prints from The Apotheosis of Love will be available soon, and I will write more on its conception in a later post.

Best wishes to you,

Marsha

PAINTING WHITE TO PLEASE THE HUMAN EYE

Since Aristotle was the first person we know of that gave serious, objective thought to the rainbow and rainbow color theory, it behooves us as artists to contemplate it as well. This instruction is written as though the artist is new to the concepts of painting in spectrum white color, and approaching the process for the first time. Thus, I apologize in advance if what follows seems overly simplistic, but these details may prove helpful to some.

Firstly, two important points should be mentioned here:

1) When mixing the greyscale, this is how to get a true, neutral set of greys; otherwise, they will tend toward blue: adding just the barest touch of raw umber to the black pile of paint on your palette is important. Preferably use mars black, as it is generally less blue than ivory black. Then lighten a small bit of it to check that you have not added too much umber—this will make it look dirty if you have, and you do not want the whole pile polluted.

2) Although the tube colors for white spectrum are customary for the purposes of demonstration, they are still somewhat flexible. For example, you may find that you have manganese violet in your paint box but not cobalt violet; or you may find that your garment is in a warmer light setting and you would prefer using a violet commensurate with that. It is okay.

It Always Goes Back To Values

However, despite guides and formulae, you must still understand why you are choosing to paint with spectrum white, and be able to determine your darkest and lightest values in the three situations/conditions outlined below: *Light, Shadow, and Sunset. After determining the situation, you look at the garment and think like this: “My darkest dark is a value 3 so, since purple is first on the rainbow spectrum (following their order) and comes out of the tube at value 1, I will lighten my purple with white until it is a value 3. Then, I can tint some grey with it, which should result in a purple-ish white value 3. The next color in the spectrum is ultramarine, so I will lighten that color to a value 4, and then mix it with a value 4 grey,” and so on, up the spectrum.

Remember that, ultimately, we don’t want the whites on our paintings to be white, but we want to portray a colorful rainbow spectrum that viewers perceive as white, thereby adding an almost otherworldly glow and sparkle. However, avoid excessive color in the greyscale.  We want the viewer to remark, “What a vibrant white dress!” not, “Look at all the colors in that dress—what is that supposed to be?”

Paint Mixing

SpectrumWhitePaletteP1110237

Situation 1:  Here are the Munsell/rainbow spectrum colors in the light, by name, from dark to light, and their oil paint equivalents:

  • (*1) Purple —Cobalt Violet (or Dioxazine Purple, or Ultramarine Blue+Alizarin Crimson Perm.)
  • (*1) Purple-Blue —Ultramarine Blue
  • (*3 or 4) Blue —Cerulean Blue (or Phthalo Blue+Phthalo Green)
  • (*1) Blue-Green —Viridian Green (or Phthalo Green)
  • (*5) Green —Cadmium Green (or Hansa Yellow+Viridian)
  • (*8) Yellow-Green —Phthalo Yellow Green (or extra Hansa Yellow+Viridian)
  • (*9) Yellow —Cadmium Yellow Lt.
  • (*7) Yellow-Red —Cadmium Orange
  • (*4 1/2) Red —Napthol Red Lt.
  • (*1) Red-Purple —Alizarin Crimson Permanent (or Phthalo Rose)
                –Titanium White
                –Mars Black

*numbers indicate the value of the color, directly out of the paint tube

Situation 2:  The oil paint colors to use for spectrum white in shadow, dark to light, are:

  • Alizarin Crimson Permanent (or Phthalo Rose)
  • Cobalt Violet (or Dioxazine Purple, or Ultramarine Blue+Alizarin Crimson Perm.)
  • Ultramarine Blue
  • Cerulean Blue (or a mixture of Phthalo Blue+Phthalo Green)

Situation 3:  Finally, although it may seem strange to start in the middle of the spectrum with Cerulean as the darkest value, the list still follows the spectrum order. The oil paint colors to use for sunsets, seascapes, or snow, dark to light, are:

  • Cerulean Blue (or a mixture of Phthalo Blue+Phthalo Green)
  • Ultramarine Blue
  • Cobalt Violet (or Dioxazine Purple, or Ultramarine Blue+Alizarin Crimson Perm.)
  • Alizarin Crimson Permanent (or Phthalo Rose)
  • Napthol Red Lt.
  • Cadmium Orange
  • Cadmium Yellow Lt.

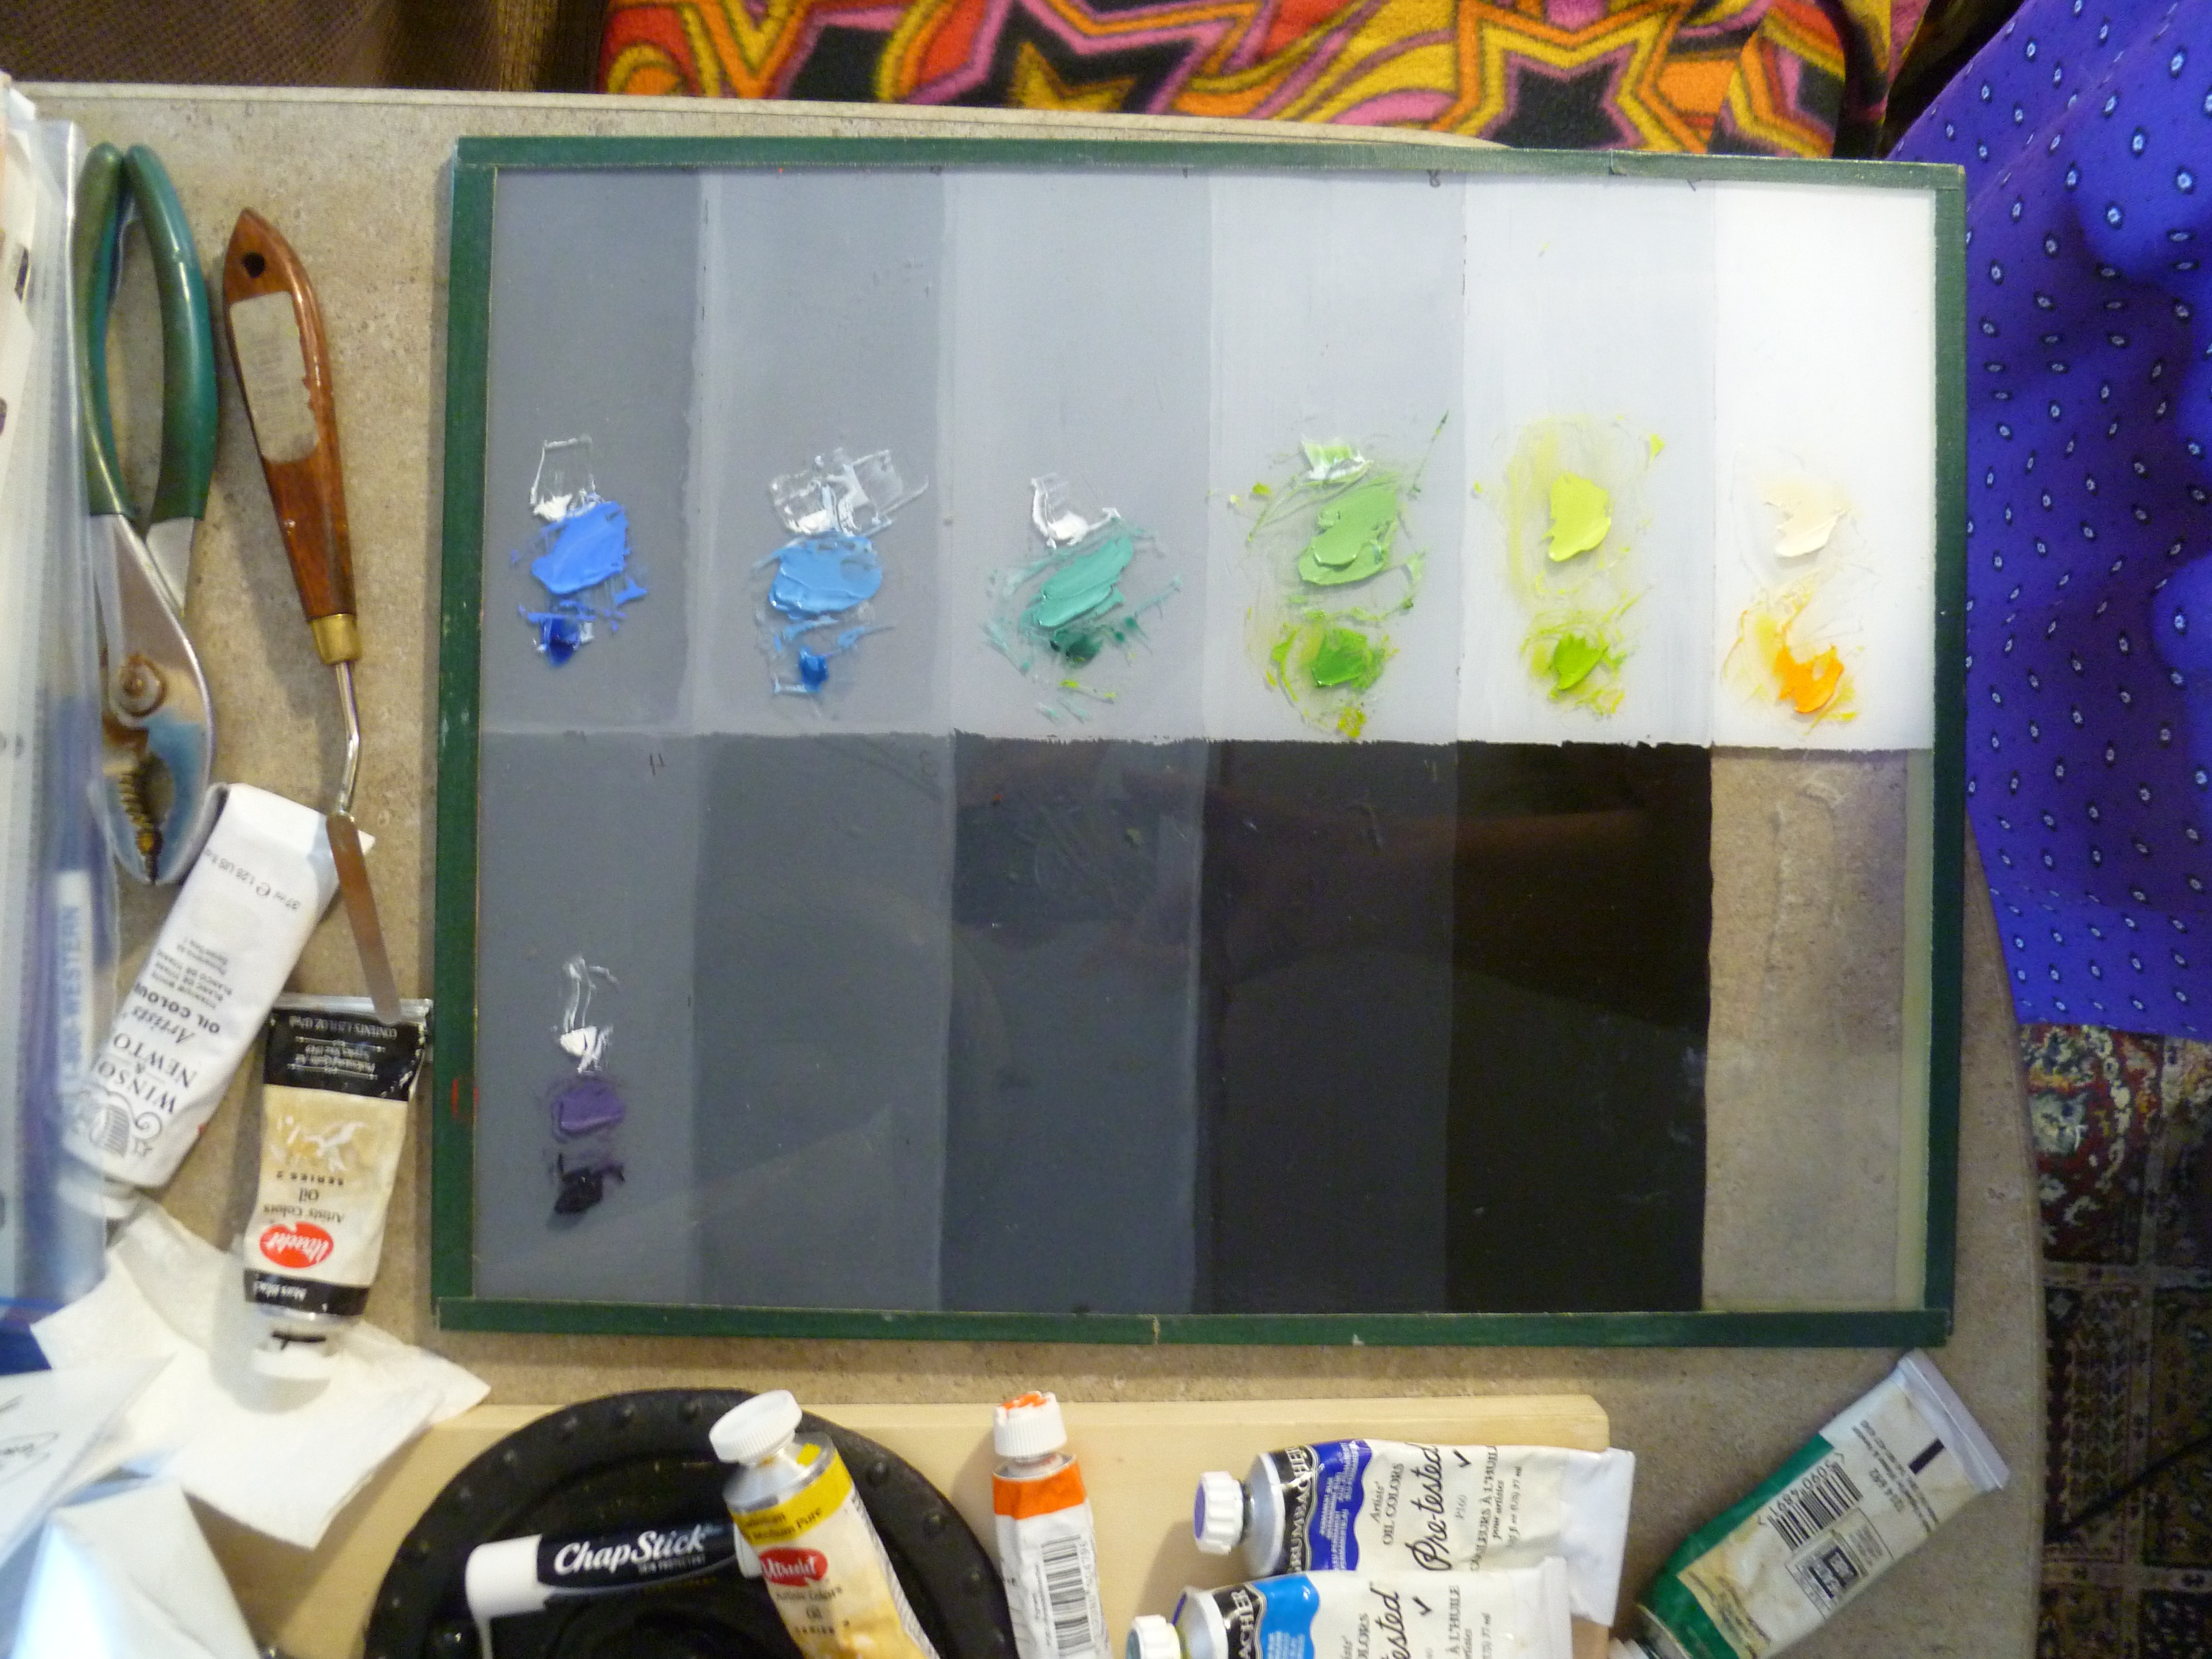
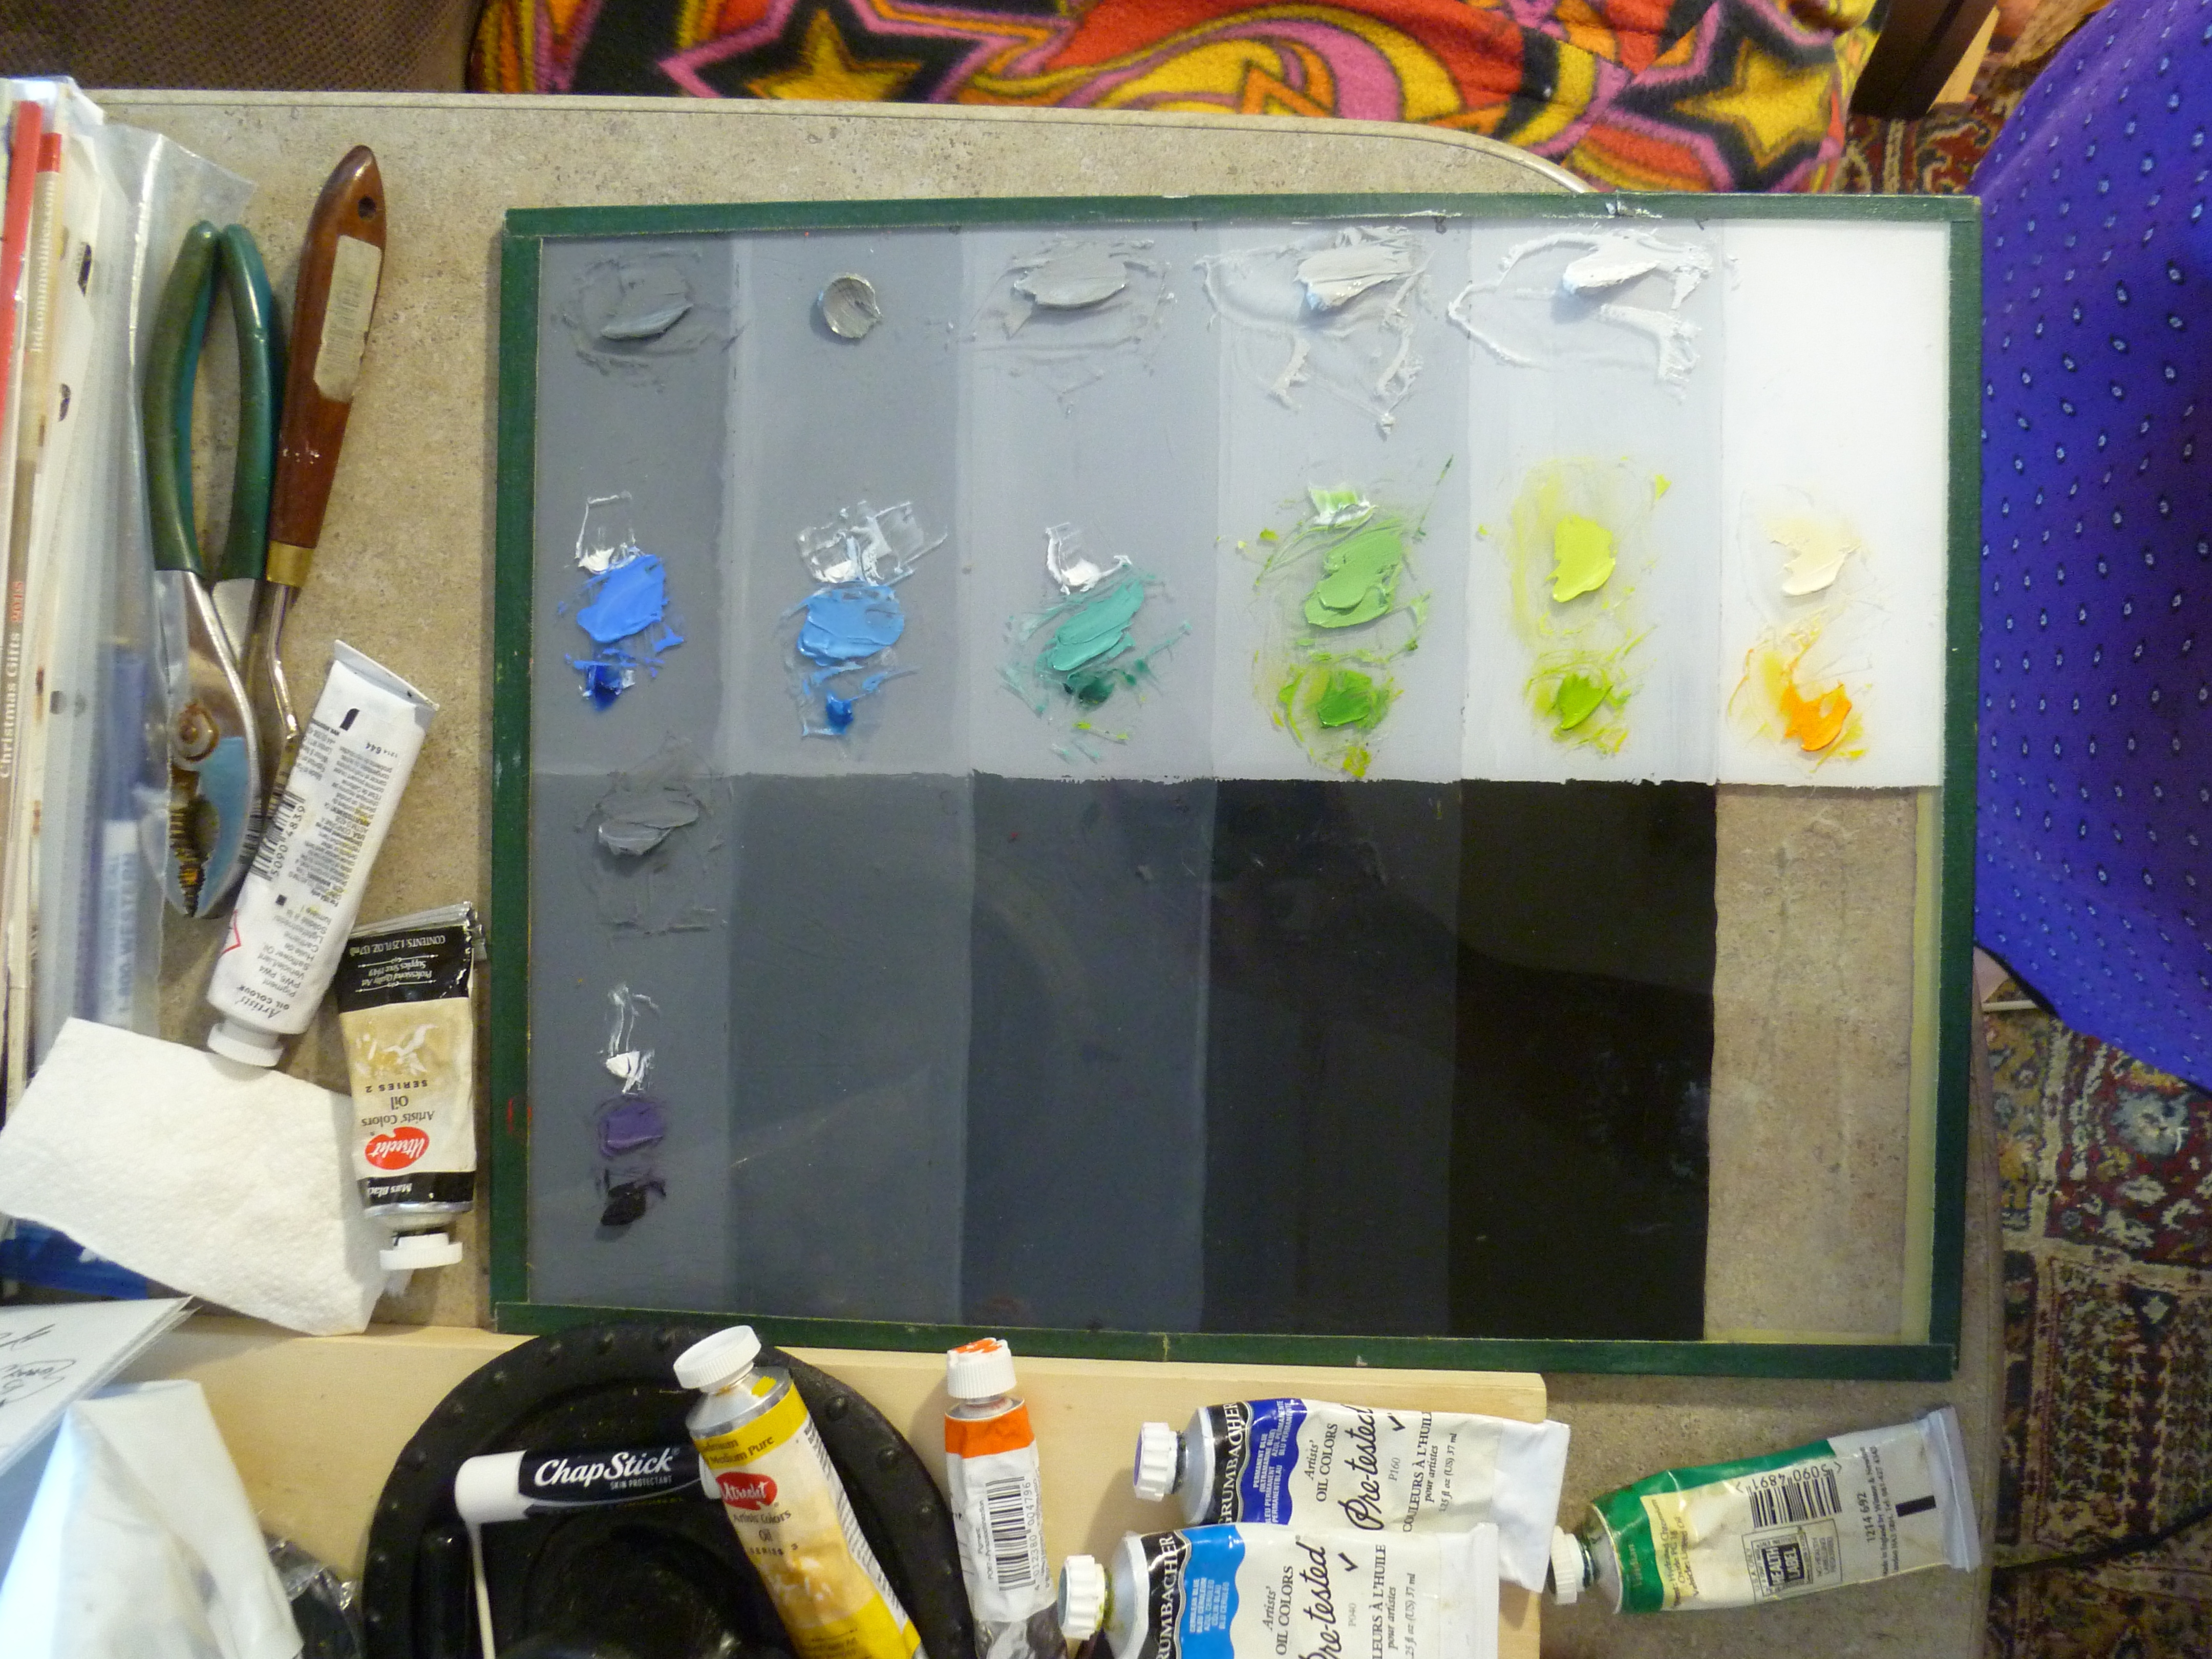
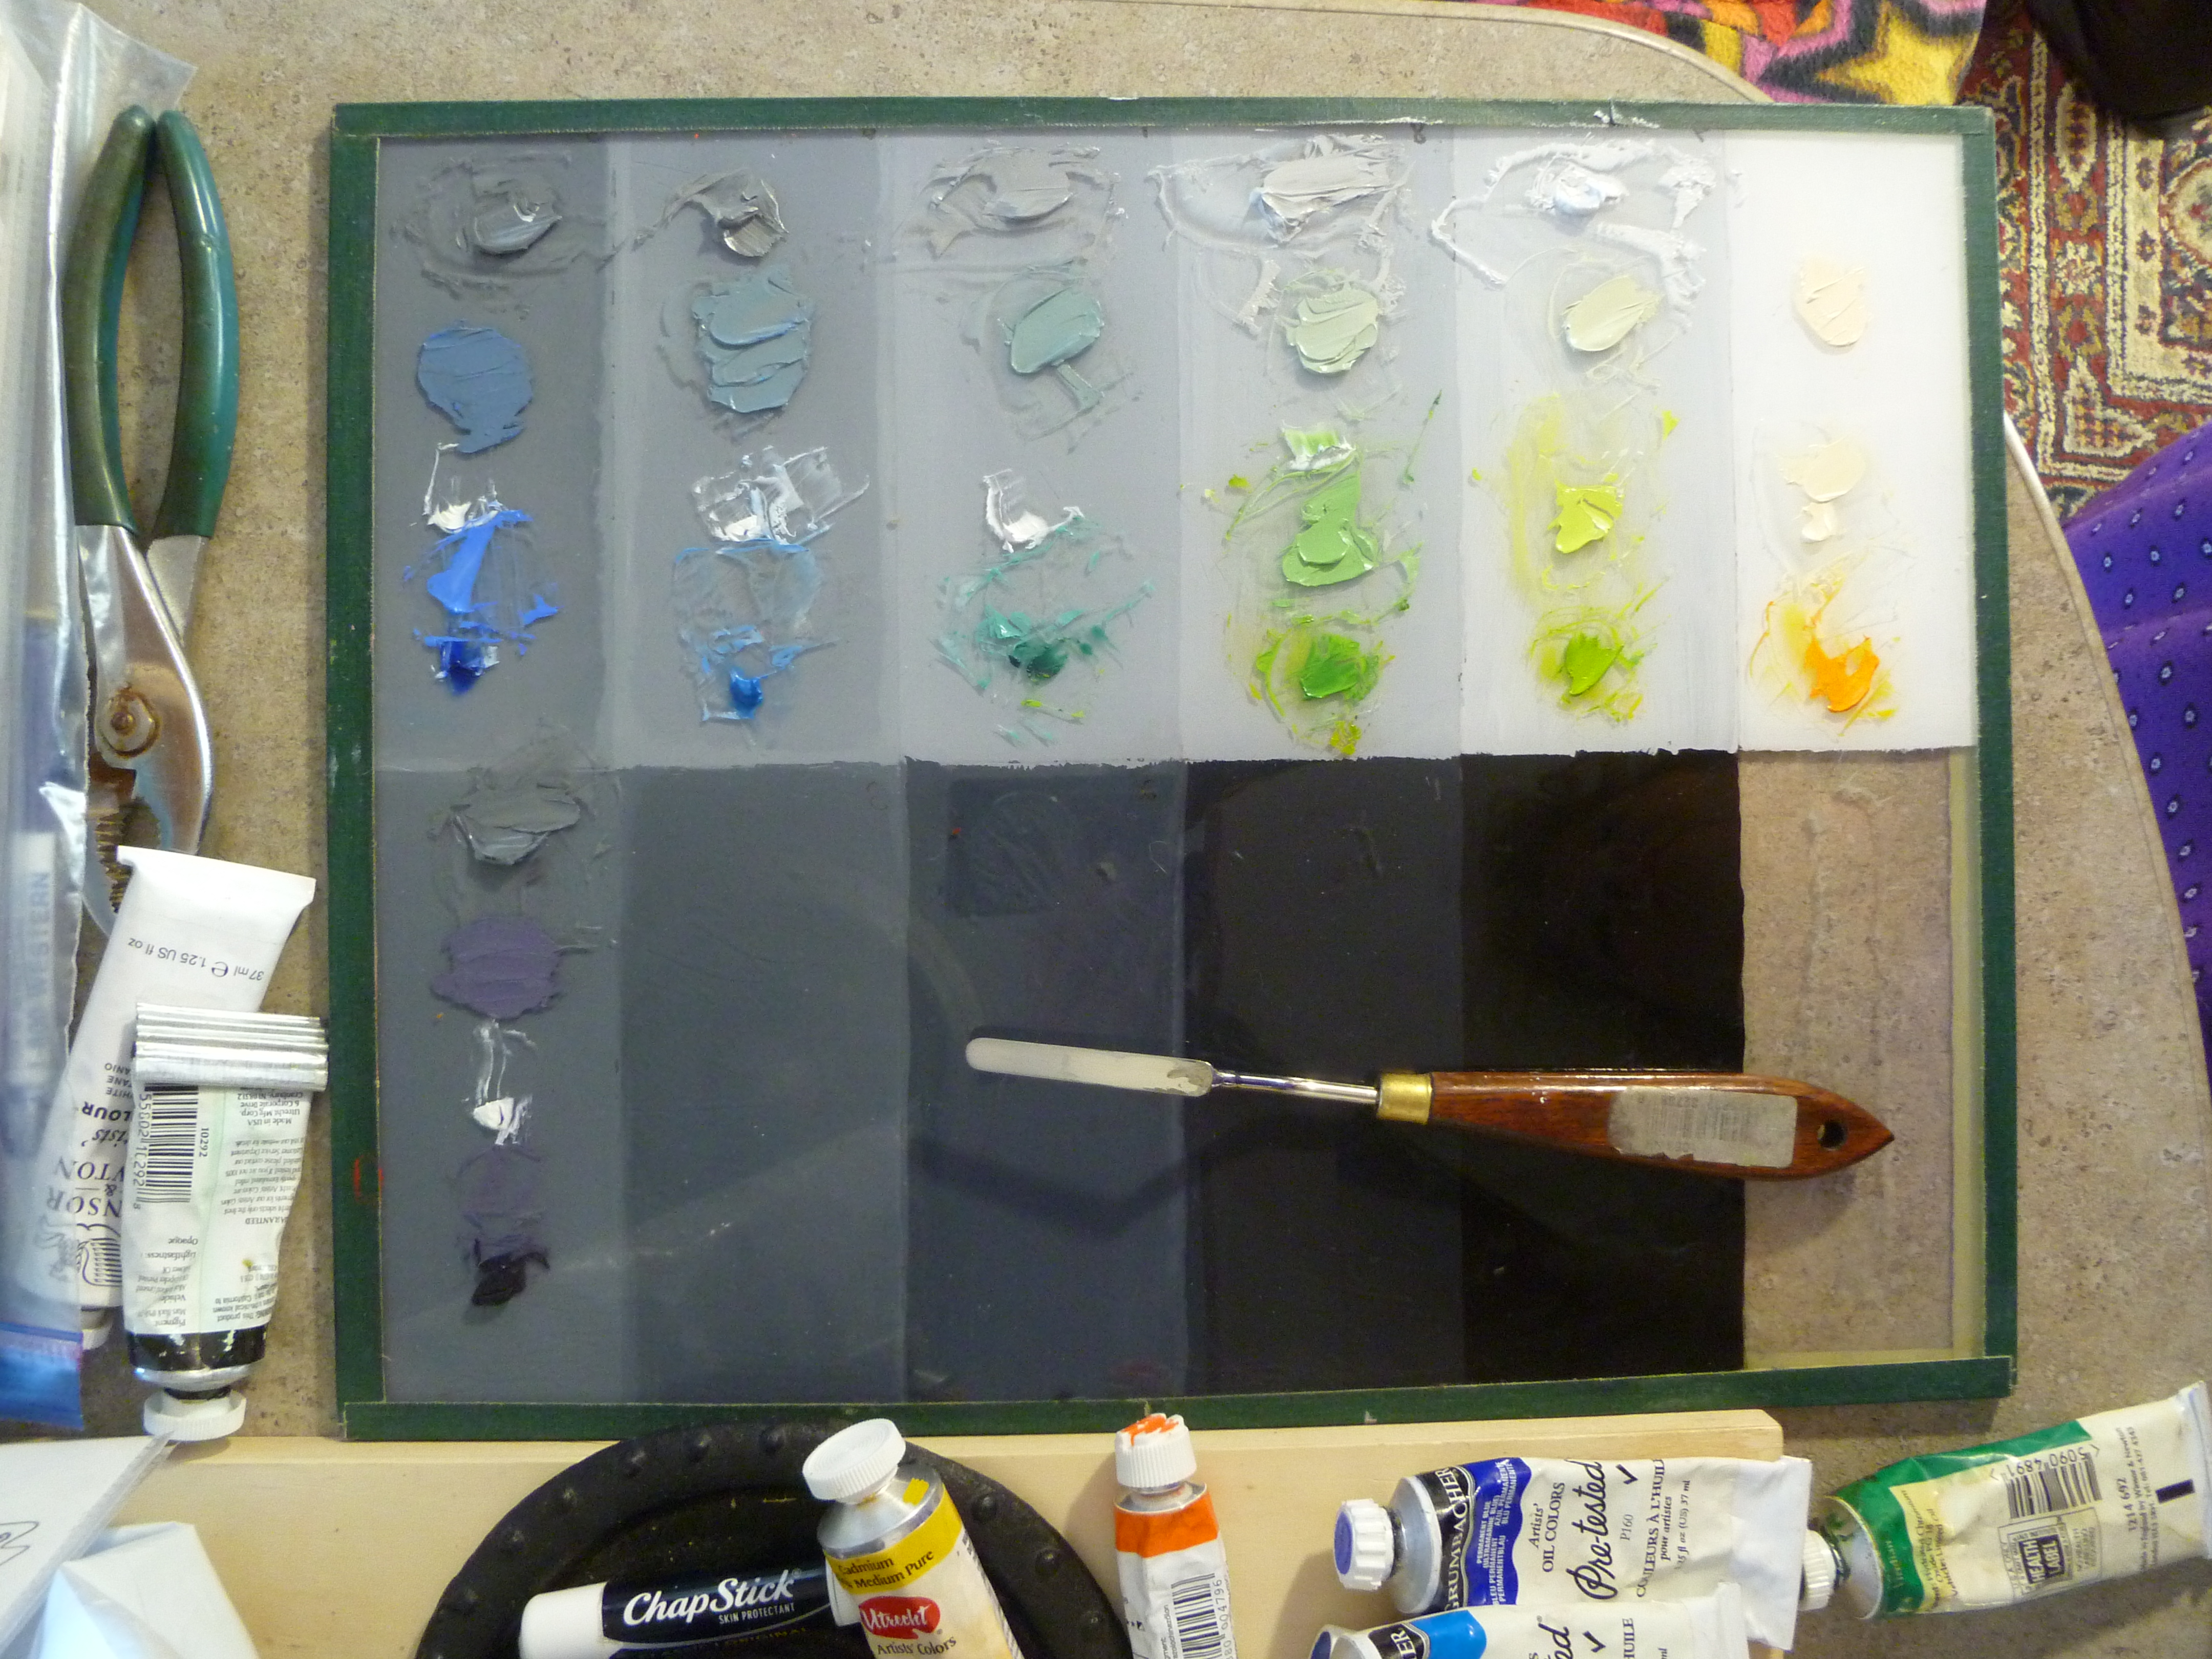
Here is the resulting color chart, and the explanation of each row of the chart:

PaintingSpectrumWhiteColorChart        

Situation 1
Row 1, Greyscale, V3-9
Row 2, each color lightened to match respective grey values
Row 3, the result of mixing greys with respective color values
Situation 2
Row 2, lightened to match grey values 5-8
Row 3, the result of mixing greys with respective color values
Situation 3
Row 2, each color lightened to match respective grey values from row 1
Row 3, the result of mixing greys with respective color values

A note here—Sometimes you will need half-steps in your values, so keep in mind that just because you have only 4 colors to use for shadows (for example), does not mean you necessarily have only 4 values to address in your white shadows. You may have 5 or more values in your shadows, so you simply spread these four colors to a broader value range, commensurate with the needs of your painting. The same holds true for the other two situations outlined above.

We must also keep in mind the concept of “reflected light” as it relates to white objects and how they will be affected. Everything that is near your white object or garment, whether it is an apple or a curtain, will be reflected somewhere in that white object or garment, so a way to handle those reflected lights might be to gently glaze the reflected light color on top of the painted spectrum white object after it dries. Of course, the handling of this will be very painting-specific, and the way you accomplish it for one painting, might not be the same for the next, but it is something to keep in mind.

Now What? Analyze which situation applies to your painting, then paint it from dark to light using these instructions.  In a previous post, I have painted a quick example on the use of spectrum white that might be a useful reference.

*A big “thank you” goes to Charlene Higley for differentiating and fine-tuning these three conditions.

FRANK COVINO, LONG-TIME FRIEND AND MENTOR, HAS PASSED

Covino Portrait1P1070431PaintingWorkshopCovinoFrank4-2015

Dear Artists and Friends,

It is with ineffable sadness in our hearts, that I must report this news.  Our friend and long-time art teacher and mentor, Maestro Frank Covino, passed away suddenly on Tuesday, February 16, 2016, after being pronounced “cleared of cancer” just last week.

If I may use a bold simile, his loss feels like looking up at the mountains in Sugarbush, where Frank worked hard to build the home he loved, and seeing that the grandest of summits has disappeared from our sight.

Here is a note from his wife, Barbara Covino, that you will all want to read:

Subject: It is with a deep abiding sorrow in my heart that I write this letter…forgive the delay but it has taken time to believe this is true…

Beloved friends and family , one and all,

After two days of profoundest shock, and countless tears I realize I must write you.  It is with a heavy, heavy heart that i must inform you that dear Frank has passed away unexpectedly on Tuesday night, February 16th.  It was quick and he did not suffer–a death we would all prefer–but he had been progressing so well, it was a gut-wrenching shock that still is unbelievable.

I truly cannot imagine a world, or a life without him…32 years of happiness and adventure.  Life was never boring with him!!! What an amazing talent, a brilliant man with a wealth of knowledge, a gentle and sensitive man who had to excel in everything he did, and was thus an inspiration to all who knew him.  He encouraged others to strive for excellence and to believe in themselves, giving them the tools to create a positive reality in their lives, whether it be art or health.  We all can repeat that golden maxim: IT’S NEVER TOO LATE TO AMELIORATE! Wise encouraging words, those.

But he was more than the sum of his parts; he was a genuine force of nature, a real Renaissance man, but above all else, he had a kind heart and a very great soul. We all loved him so; there will never be another Frank.  But I know it is now time for each and every one of us who was touched by his life, to take that spark and pass it on.  He gave us wings and it is time for us to fly…Make him proud!!!

I am too choked up to continue writing.  God Bless each and every one of you who had a place in his heart…family, friends, students….He loved you all sincerely and without guile….

We are in the process of collaborating with the family and planning both a smaller family funeral as well as a larger set of celebrations of his life and legacy open to all who loved him–one in Vermont and one on Long island.  As soon as the Covino south clan and Mark and Jennifer and I hammer out the details, I will email you all, soon as can be done.

We are going to give that wonderful man a send off he won’t soon forget!!!

Love and blessings , Barbara Covino

PS: PLEASE FORWARD THIS to everyone you can think of. It has grown into a cast of hundreds, and forgive the delay but it has taken time to believe this is true.

EXAMPLE OF HOW TO PAINT OBJECTS WITH SPECTRUM WHITES

Yesterday, I was on the phone trying to explain to a friend, how to paint white objects with the spectrum. Without the visuals it was difficult, so after we hung up, I decided to prepare a quick example for the blog.

The order of the rainbow spectrum (dark to light) is purple, purple-blue, blue, blue-green, green, yellow-green, yellow, yellow-red, red, and red-purple.  In order to match the rainbow’s values and their respective hues, we need to start where the rainbow starts. Using a 9-value scale with value 4 as spectrum purple, we work our way up the value scale from there:

4–Purple (cobalt violet)

5–Purple-Blue (ultramarine)

6–Blue (cerulean)

7–Blue-Green (viridian)

8–Green (hansa yellow plus thalo green)

9–Yellow-Green (hansa yellow plus thalo green)

White–Yellow (cadmium yellow lt.)

White–Yellow-red (cadmium orange)

White–Red (napthol red lt.)

White–Red-Purple (alizarin crimson perm.)

Here is how to think about that: since cobalt violet is a value 1 in the tube, we have to lighten it with white until it is a value 4, then put it in its proper place on the palette.  Likewise, ultramarine blue is also value 1 in the tube so we need to lighten it with white until it is a value 5.  Next in the spectrum is cerulean blue; it is a value 3 in the tube, so it requires less white to make it a value 6.

Continue working up the rainbow spectrum through value 9 yellow-green,  as listed above. The last three hues (not shown–unfortunately, I neglected to photograph those) are simply white with a tint of cadmium orange, then napthol red in the next pile of white, and finally, permanent alizarin crimson in the final white.  Here is the palette to this point, sans the YR, R, and RP mixed with white:
P1100611

After mixing each hue to its proper value (pictured above), place the corresponding value 4-9 greys, plus 4 piles of white on your palette:
P1100612
Then tint each of the greys with a just a touch of their corresponding hues:
P1100616

Preparing a brief palette was all I intended to do when I began, but then I thought, “Why don’t I just do a quick painting of a white object and put the whole project on the blog? Since I only had an hour to spare, I did something easy:

P1100620

And because my little enameled pitcher looked like it was floating in the air, I mixed together, everything on my value 4 and 5 spaces, and made the table color. Then I marbled the remaining paint together (without values 4 and 5) and spread it with a palette knife for the background of my little painting:
P1100622
A White Pitcher, 4″ x 6″

Someday, I may give it a single flower and some touch-ups but, for now, this is it.  Master painter, Charlene Higley, will be teaching all of us how to mix spectrum whites for light, shadow, and seascapes.  Feel free to contact me by posting below, if you would like to attend (free) the 2-3-hour class in March, 2016.  It will be held in Gilbert, Arizona.

Karen Schmeiser, another master painter in our Arizona Renaissance Art Guild, has a lot of experience with using the spectrum white palette.  She is currently working on this painting.  Notice the effect of the subject’s lighting.  She has added the color of the candlelight to each of her spectrum values to portray the white garment:

Karen

Karen1

I hope this helps you.

And please don’t forget about Frank Covino’s workshop coming up in Gilbert, Arizona on November 9-13, 2015.  We still have space if you want to come.  See the post, Workshop Announcement, dated Sept. 27, 2015.  Contact me through this blog if you are interested.

Follow my blog to get the latest post sent to you.

All the best,
Marsha

RAINBOW HUES

We have already “hammered away” at the importance of Value, so this is a good time to introduce the set of terms devised by Munsell, that help us discuss and reproduce color:

Hue–the name of a specific color as it appears in the color spectrum.
Value–the specific darkness or lightness of a color.
Chroma–the specific intensity (brightness or dullness) of a color.

Color_Wheel_Finished_Website1

Here, we will address “hue.” Although there are many varied color wheel designs, Munsell incorporates ten basic hues that come from the color of light as seen through a prism, or the rainbow spectrum. By shaping them in a circle, they become the color wheel. They are:

red-purple, red, yellow-red, yellow, yellow-green, green, blue-green, blue, blue-purple, purple

Every color falls into one of these ten basic HUE categories, or possibly between two of them, where reside the interhues.

Most artists have had at least one important teacher. Mine was/is Frank Covino. He designated tube names and value numbers for Munsell’s ten hues.

At first, you may be tempted to gloss over this list, but imagine going to the store and selecting the most useful green, red, or yellow, and then assigning its value as you go, all the while keeping in mind how the colors will all interact, and choosing those that work best together in the largest variety of situations–methinks not the easiest of tasks.  This work has been done for you, here:

Red-purple is Alizarin Crimson, which is a value 1 tube color.
Red is Cadmium Red Light, which is a value 5 tube color.
Yellow-red is Cadmium Orange, a value 7.
Yellow is Cadmium Yellow Light, a value 9.
Yellow-green is Pthalo Yellow Green, value 8.
Green is Cadmium Green, value 1.
Blue-green is Viridian Green, value 1.
Blue is Cerulean Blue, value 3 or 4 (depending on the brand).
Purple-blue is Ultramarine Blue, value 1.
Purple is Cobalt Violet, value 1.

These tube colors should visually disappear when placed on corresponding value numbers in the value chart (Don’t forget to squint, as discussed in the last post.).  If they look like freckles instead of disappearing, you know you either have them in the wrong place, or your value chart is not correct.  That’s why we use the Covino Palette–those values are already prepared for you to start using at once, without a lot of fumbling about.

Follow my blog to get the latest post sent to you.

All the best,

Marsha

WORTH REPEATING

This subject was addressed a long time ago, but it is so critically important that it bears repeating. Of course, it’s about values because, without a thorough understanding of them, you cannot create significant paintings.

Many teachers assume that we all know what “value” in paintings means, so they don’t really elaborate and tell us HOW to see them. The concept is easy to understand when we’re talking about a greyscale, but extrapolate that to color, especially the various colors juxtaposed together to make a painting, and the values concept becomes murky.

You can make an entire painting a monochromatic green or even pink and, as long as those pinks have correct values, your painting will “read” and make sense to the viewer no matter what color you make it. Value is simply how dark or how light that color is.

Yes, but so what? Where’s the “how?” Well, first you have to learn to squint enough at something until the color disappears and you are left with a percentage of light. What amount do you see? Make your own value scale and go around your house placing it next to various objects; squint to make the color disappear so that you can just see the value of the object and not the color. This is a great way to train your eye.

Here is a value scale you can print, showing values 1-9 with the addition of black (which is the absence of light) and white. The lowest value is 1, or 10 % light; the next is 2, or 20% light and so on, up to value 9 at 90%, with white being 100% light:

value scale

When making a painting, values aren’t actual light, of course, but values create the illusion of dark and light in varying degrees (shadows and highlights). Value deals with the lightness or darkness of a color.

Here is part of Bouguereau’s Vendangeuse (The Grape Picker) in color:
Vendangeuse (The Grape Picker)BouguereauCropped
And here it is in greyscale, showing just the range of lights and darks (aka “values”):

Vendangeuse (The Grape Picker)BouguereauGrayscale

And here is the pink version:

Vendangeuse (The Grape Picker)BouguereauGrayscale

So, even in pink values, we still see the little girl, instead of a Botox Babe.

When we do a value-scale underpainting, we are separating the problems of seeing values in one hue vs. seeing those values in juxtapositions of many colors (hues). This makes the painting much easier to execute, and more accurate, because now you have a process.

And that’s why I say you must know how to see value because value analysis and then value duplication is the basis of all perception. It is the common denominator for the replication of all things, whether landscapes, still lifes, or portraits.

Follow my blog to get the latest post sent to you.

All the best,

Marsha


PART 7, CLASSICAL ACADEMIC APPROACH, MIXING VERDACCIO

Before you begin your verdaccio underpainting, make sure you have completed everything you want to accomplish with India ink, charcoal, and gesso and/or gelatin in bas relief, so that your rendering looks as perfect as it can.  This functions as your value map for the underpainting, and if it is perfect, nearly everything at Value 5 and under can be quickly glazed, rather than painted.  Of course, the need for the perfect underpainting is that glazes are transparent, and everything will show through!

Look closely at the enlarged version of this drawing; can you see the areas where it seems to be especially white? Those are the places where, if you could run your fingers over the board, you feel the bas relief of the gesso that has been built up only in the areas you want to advance, to give the painting extra dimension.  Pretend you are a sculptor and pay special attention to areas like jewelry, headwear, the forehead, nose bone and tip, shoulders near the viewer, lower lip,  muscle structure, illuminated areas of dark garments, fabric folds that are closest to the viewer, and anything else you want to advance.  Make sure you smooth those built up edges so they blend smoothly into the board surface–you don’t want them looking pasted on.  You should not see the physical edges of the build up:

P1060404

P1060407

Mixing verdaccio in nine values is the next step. Here is where you will make your life so-o-o much easier if you have purchased Frank Covino’s Controlled Palette.

PaletteFront

Before mixing any paint on the Controlled Palette, coat it lightly with olive oil.

To mix verdaccio:

*Put 2, 8″ strips of chromium oxide green on Value 2
*Put 1, 8″ strip of mars black on Value 2
(= 3 strips total on Value 2)
Mix together thoroughly for a “Value 2 verdaccio.”
Value 1 is comprised of equal parts of Value 2 with Mars Black.
Values 3 – 9 are made by the addition of Flake White to Value 2, then 3, etc. (aka a “color string”).

Then cover it with Saran Wrap (the most non-porous wrap in my tests) and put it in the freezer until you’re ready to paint. Even better is to buy multiples of the three colors and some empty tubes, and tube your mixtures. That way, you won’t have to mix it again for a year or more.

Follow my blog to get the latest post sent to you.

All the best,

Marsha

P. S.  Just a note to let you know of an upcoming workshop

Hello, readers. The Arizona Renaissance Art Guild is hosting a one-week workshop with Maestro Frank Covino, art teacher extraordinaire. If you will be in the Phoenix area on April 6-10, 2015, we would like to invite you to attend and make some new painting friends.  The cost for the week is $695.  Respond to this post if you are interested.  We still have two spaces available.